
Beginner Barber Hair Cutting Guide For Barbers With Little To No Experience
When first learning to cut hair it can look very simple, and easy to learn how cut hair however as you start to learn you’ll find out it’s actually harder than it looks. There can be many obstacles that you may experience when learning how to cut hair. The most common problems that you might have to deal with are learning the basic fading techniques, the guard sizes, how to blend using guard attachments, how to use the taper level on side of the clipper, how to take out the skin line, and many more obstacles. Those are just some of many things you’ll have to learn when you are trying to learn how to cut hair. As you gain more knowledge, and experience little by little you’ll start to improve cut by cut.
See anyone can cut hair, but if you really want to become great at it you’ll have to appreciate the fact that it’s really a form of art. It will take a lot of learning, practice, and trial, and errors to become great unless you’re naturally gifted. When you mess up a haircut is when you actually learn the most!
On this article you’ll learn some important information that will help you when it comes time to do your first haircut, or help you on your next hair cutting experience.
What Tools You’ll Need To Begin Cutting
To perform a haircut the most important tools you’ll need is of course a hair clipper, and trimmer. You can first start off with a clipper, and trimmer from your local Walmart store ,and as you get better you might want to Invest in a better quality professional clipper, because it’ll be so much more convenient, and efficient.
A great first choice hair clipper is one you can get at your local Walmart is called the Wahl color pro hair clipper. This clipper is great for beginners, and it’s very affordable. Other great clippers at good prices to start cutting hair are the Wahl magic clip, and the Wahl designer.
A great first trimmer to start with, and also available at walmart is the andis headliner. It’s cuts really well, the blade is sharp enough for all the detail work of a haircut. It can also be zero gapped for extra sharpness.
Basic Equipment
This list covers basic equipment you should consider having. These tools can help you achieve better results, and a overall better hair cutting experience.
- Water bottle – For wetting the hair before, and during the haircut if the hair is flat, dirty, or messy, and tangled.
- Barber comb – For combing access hair when tapering or, fading can be used instead of a hair brush.
- Flat top comb – For using clipper over comb techniques, and combing out the hair before the haircut.
- Haircutting cape – For covering up your client so hair won’t get on clothes.
- Neck strips – For wrapping around your client neck before securing the hair cutting cape so hair won’t go into the neck. Also a bacteria barrier from the cape, and skin contact .
- Neck strip dispenser – to hold the neck strips.
- Neck duster – For dusting off hair from your clients face, and neck.
- Wall mirror – For checking your work twice. The mirror lets you see dark spots, lines of demarcation, to check if the hairline straight, and to check if the lineup is symmetrical. The mirror never lies
- Aftershave – For cooling and cleaning the skin after a haircut.
- Hair brush – For brushing hair off to see dark spots, and lines of demarcation when cutting a skin fade or skin taper.
- Clipper brush – For brushing off hair as hair can build up on the clipper blade, and housing.
- Nick relief – For just in case you accidentally cut someone.
- Shears (hair scissors) and Thinning shears- For trimming longer hair, and blending hair on side of the head into the top.
- Andis 5 in 1 cool care – For disinfecting clippers, and trimmers in between haircuts and to cool down the blade as they tend to get hot.
- Clipper oil – For oiling clippers and trimmers for maximum performance, and power.
- Hair gel – To put on the client after a haircut to see lose hair sticking up to detail the haircut better.
- Gloves- This a optional choice, but gloves help keep things sanitary, and help you from getting hair splitters which hurt. Gloves are not for looks, but for sanitary reasons.
- Clubman talc powder – To apply on the neck duster to brush off hair easier
- Baricide jar – To put combs, shears, guards, and other supplies into to disinfect.
- Baricide salon disinfectant – To mix with water in the baricide jar.
- Floor mat – It helps to stand on a floor mat when your cutting hair so your feet won’t get as tired.
- Barber chair – Having a barber chair really makes a big difference on how easier it will be to maneuver your client to see every angle of the head.
Hair Cutting Place And Lightning
Before you do any hair cutting figure out where will be the best spot to do the haircut if you’re doing it at home. Garages are good spots, and most common, but if you don’t have a garage the bathroom will be the next best option.
Observe the lighting in area you are about to do the haircut, it’s best to cut hair in a well lit area. You don’t want to be cutting where there’s to many shadows as it’ll be hard to see the hair you are cutting.
Daylight led light bulbs are ideal as you can see more details so if your restroom, or garage has soft white, or other lighting you might want to change them. Don’t cut hair outside directly in the sun as the bright sun can make it seem like your haircut is done, and blended when in reality there still might be dark spots, and bulk.
If outside is the only place you can perform the haircut try to find some shade like under a tree. Yes lighting is very important, and well dictate how good your haircut will be. If there isn’t enough lighting in the area you might want to add more lights like shop lights. Make sure you use daylight lighting.
Before Cutting Hair
Before you begin any haircut its recommended to analyze, and visualize. Analyze your clients head shape, indents, and imperfections in the skull. Sometimes imperfections in a persons head will affect a haircut. Also check if his hair is flat, or tangled which usually happens when a hat is worn.
If the hair is tangled spray water, and get a comb to comb out the hair, and untangle the hair as much as possible. This is a important step because cutting tangled hair can sometimes cause you to cut more, or fade more than you intended.
After analysing your clients hair next ask what hairstyle they’ll would like. Sometimes the client is not sure, or doesn’t know what the hairstyle they want is called. This can cause you to misinterpret the hairstyle so it’s best to talk, and make sure you, and your client are on the same page.
Ask your client if he has a picture so you can get an idea of what they want. In most cases they already know what hairstyle they want.
Now as a beginner you probably don’t know how to do the common hairstyles like a fade ,skin fades, comb overs, fohawks, mohawks, and tapers etc. So really before you cut anybody’s hair it’s helpful, and recommended that’ll you take some time, and learn your tools functions, and learn how to use, and understand the guard attachments lengths .
Learning Clipper Functions
I recommend that you take some time to learn the hair clippers functions, and how to use the taper lever on the side of the clipper. Almost all types of haircuts require a clipper with a taper lever to adjust the length of the blade to blend a haircut flawlessly.
Their are three main taper lever positions which are closed, half ways, and open. The taper lever simply adjusts the length of the blade.
Closed blade –Taper lever is all the way up towards the front of the clipper.
Half ways – Taper lever is in the middle and set in between closed, and open position
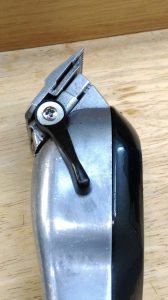
Open blade – Taper lever is all the way down towards the back of the clipper.
When the taper lever is closed it cuts more hair, and the blade is at it’s lowest cutting position. When the taper lever is open it cuts less hair, and the blade is at it’s longest cutting position. Most standard clipper blades are set 000 to 1 without being zero gapped.
When you push the taper lever up towards the front of the clipper it’s called closing the blade. If the taper lever is pushed all the way up it’s called the closed position( blades closet to each other) it’s going to cut the shortest length possible about a #000 length with most clipper blades, and that length is bald, but not skin bald.
When the taper lever is pushed towards the back of the clipper it’s called opening the blade, and when pushed all the way down towards the back of the clipper blade it is set at a open position (blades farthest apart ) it’s going to cut about a #1, or a little lower, and cut a little more hair off than a #1/8 hair attachment.
Another taper lever position that is often used when fading from skin to longer hair length is the half ways position which will be in between closed, and open position. That position it’s going to cut at about a #0A Oster detachable blade length. These positions on the clipper lever are commonly used when fading, and tapering to smoothly blend any haircut.
(Note: These lever positions and their hair cutting lengths apply to most 000 to #1 clipper blades)
In this video you’ll see a demonstration of a open, and closed blade postion.
In this video you will see a demonstration on how to use the lever positions when you’re cutting hair.
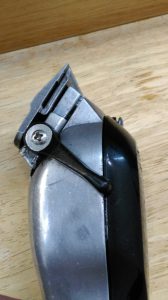
How to adjust hair clipper power screw
On some hair clippers there is a power screw on the side of the clipper that you can adjust if it’s lacking power. Mostly magnetic hair clippers have the power screw on the side, and it’s very simple to adjust.
Adjust your hair clipper power screw if you feel that it’s not as powerful as it can be, or if it’s not cutting the same as it used to.
Also if your hair clippers is making a loud noise, or vibrating excessively it can be because the power screw is out of alignment. So adjusting the power screw should solve that problem also.
The only tool you’ll need is just a screwdriver.
Here’s a video on how to adjust your hair clipper power screw.
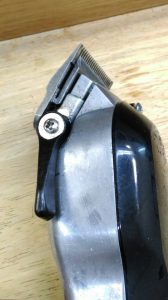
How to fix a snagging clipper blade
Sometimes when your cutting hair the blade sometimes might snag, and pull all of a sudden. Also when you first turn on your hair clipper, and start to cut a client the blade sometimes will pull the hair, and not want to cut. Most of the time it’s easily a simple fix.
All you have to do is push the taper lever down towards the back of the hair clipper, and then back up to towards the front of the hair clipper with the hair clipper on. So basically push the taper lever down, and up. Do this a couple of times.
If this doesn’t work try oiling the blade, and then spraying Andis cool care 5 in 1 with the hair clipper on. Wipe down the hair clipper with a paper towel then move the taper lever up, and down with the hair clipper on. This should fix your problem.[supsystic-price-table id=23]
A lot times a hair clipper will pull, and snag when cutting down longer hair on top of the head. This is normal, because some hair clippers just don’t have enough power to knock the hair down with ease. Another reason for snagging clipper blade can mean that the blade has to be clean thoroughly.
Simply Unscrew the blades, and brush off the access hair of the guide blade, and cutting blade. Then reassemble the blades back together, and check if they cut better. But if you had your hair clipper for a couple of years or so, and you noticed the blade starting to pull the hair instead of cutting it. This can mean another problem.
It might be time to change the blade on the hair clipper. As time goes by the hair clipper blade starts to get dull, and the sharpness of the blade fades away. When this happens i recommend you get a new replacement blade for your hair clipper, or you can also have them sharpened by a professional. You can order the replacement blades online, or get them at your local beauty supply store.
Learning hair clipper comb attachment guard/guide sizes
A very Important thing you must know is how to use hair clipper comb attachments. First you have to get an idea on the lengths of each comb attachment, and how much hair each comb attachment cuts off.
The standard guides sizes for most hair clipper companies are sizes #0 (1/16) which is the lowest guide size, and cuts the hair to about a 1/16, and to the biggest guide size #8 ( 1 inch) which is highest comb attachment for most clippers companies, and leaves the hair about a inch long.
Wahl comb attachments, and Andis comb attachments lengths cut at different lengths. For example a number #2 (1/4) Wahl comb attachment will cut less hair, or leave a little more hair than a #2 (1/4) Andis guard. This is because they’re different in design, and Wahl comb attachments are made for just Wahl clippers, and Andis comb attachments are made just for Andis clippers.
They will still be about the same size, but the Andis #2 (1/4) will be a little shorter. The Oster universal comb attachments, and the Andis magnetic comb attachments cut about the same length. It’s just the Wahl comb attachments that are a little different in length. Another example is the Wahl #1( 1/8) attachment comb it will cut a bit more hair than a Andis #1(1/8) magnetic comb, and a Oster universal #1(1/8) comb. Once you try these different combs you’ll see the difference.
Watch this video below if you are having trouble understanding hair clipper attachment combs watch until the end it will help you a lot.
Blending all the attachment comb sizes together is very simple, but can be confusing at first. Let me start by saying anything bigger than #1 1/2 (3/16) will blend Into each other nicely by with just opening the lever, and closing the lever, or you can also do it opposite by closing the lever, and opening the lever.
So starting with a number #2 (1/4) every attachment comb starting with a #2 (1/4), and higher will blend into each other by just closing the blade with the lever all the way up, and opening the blade with lever all the way down.
For example if you do #2 (1/4) on the sides, and a #8 (1 inch ) on top. The first step will be to cut the top. You’ll first cut the top of the head using the #8(1 inch) with the taper lever up all the way ( closed blade). Then you’ll cut the sides making the first guide line with a #2(1/4) with lever up all the way (closed blade) around the whole head up to the temple area, or the desired starting area. Depending if you want to give a low ,median, or high fade the first guide line will determine how high or low the fade will come out.
Next with the #2 still on the hair clipper you’ll open the lever all the way down(#2 attachment with open blade) to make a #2 1/2, and go about a inch above #2(1/4) closed. Now you’ll get the next size up which will be a #3(3/8) starting with the lever open to start blending above the #2(1/4) taper lever open which is also consider a 2 1/2. Then closing the lever all the way up with the #3(3/8) to blend Into the top of the head cutting a little above where you left off with the #2(1/4) open then you’ll get the #4(1/2) lever open then closed, and go above the #3(3/8)to blend into the #8(1 inch) on top, and so on .
(Note: When cutting the top of the head always cut with lever position at a closed position unless they ask for a size, and a half for example if someone ask for 3 and a half (3 1/2 ) to make the half size all you have to do is push the lever all the way down on the hair clippers with the #3 (3/8) attachment comb on the hair clipper to the open position to make a 3 1/2)
Do this with every attachment comb left to blend into the #8(inch) all you’ll have left to use is #5(5/8), #6(3/4), #7(7/8) using open, and closed technique to blend into the top. It’s all a sequence to blend. You don’t have to put the lever in the middle, or any other position when blending into the top of the head when using a #2 (1/4) or any longer attachment comb above the #2(1/4). All it is, is opening, and closing the taper lever on the hair clipper.
(Note : When you have a attachment comb on the hair clipper, and you push the taper lever all the way down. That adds a have a half size to whichever hair attachment comb you have on the hair for example a #1(1/8) with the lever all the way down to open position is now a #1 1/2, and so on. It’s applied to all hair attachments when the taper lever is in the open position with the attachment comb on the hair clipper)
When To Use All 3 Lever Positions (Closed, Half ways, Open)
The three main guards you’ll might have to use all three lever positions which are closed, half ways and open position are the #0 guard comb (1/16), #1 guard comb (1/8), and the #1 1/2 wahl guard comb (white or burgundy guard ) (3/16). Basically any guard below a #2 guard (1/4). This is because anything below a #2 the guard starting with with a #1 1/2 guard will cut the hair shorter and it’s more easy to see a line of demarcation, and dark spots. Therefore you’ll have to play with the lever more. and use the half ways taper lever position if you have to.
With the #1 1/2 (3/16) Wahl attachment comb you’ll might have to put the lever in the middle to half ways taper lever position if your blending from a closed #1 1/2 (which equals a true 1 1/2) into a #2(1/4) or blending into a speed o guide size #0 (3/16) which is about a #2 (1/4) also just cuts a bit shorter than a #2 but longer than a Wahl #1 /1/2( white guard or burgundy guard). Meaning that you’ll have to do all 3 positions with the Wahl #1 1/2 (3/16) which is taper lever closed, lever half ways, and lever open when blending into a #2 depending on the type of head shapes, and hair textures.
So if you see a line of demarcation, or dark spots when you use a Wahl attachment comb #1 1/2 (3/16) taper lever open after using a Wahl attachment comb #1 1/2(3/16)(same guard) in closed position you’ll have to put the lever half ways to blend in between sometimes depending on the hair texture.
With a #1 (1/8) and a #0 (1/16) attachment combs you will have to use the halfways taper lever position because from a closed #1 (1/8), and a open #1 (1 1/2) there will be a line, or dark spot in between those to steps, and to take this little line out simply adjust the taper lever in the middle with the same hair attachment comb on the hair clipper to the half ways position and blend.
Same applies to the #0 (1/16) hair attachment comb sometimes depending on the type of haircuts texture you will have to use the half ways taper lever position to blend in between the #0(1/16) lever closed (taper lever pushed all the way up to the front of the hair clipper), and #0(1/16) lever open (taper lever pushed all the way down to the back of the hair clipper ).
Another important thing you should know about the Wahl clippers attachment combs is that you’ll will need a universal Speed O Guide #0 (3/16) which is the attachment comb that is missing between the Wahl #1 1/2 (3/16), and Wahl #2 (1/4). The Speed 0 Guide #0 will blend any dark line or dark spots between the Wahl #1 1/2 (3/16), and the Wahl #2 (1/4) making the hair transition smoother.
For some reason the Wahl #1 1/2 (3/16), and #2 (1/4) sometimes won’t blend into to each other perfectly. You still might be able to blend those guide combs together, but you’ll have to use a flicking motion, and the corners of the blade with the Wahl #1 1/2 (3/16) attachment comb when blending into the Wahl #2 (1/4).
I highly recommend getting the Speed O Guide #0(3/16) as it’ll will help you a lot when fading with attachment combs.[supsystic-price-table id=25]
How to use clipper comb attachments to fade/blend hair
Mostly all haircuts when learning to cut hair will in vovled clipper comb attachments to cut, and blend the hair. It’s all common sense when using clipper comb attachments when doing a fade, or a taper haircut, But it can get difficult, and confusing at times.
Let’s go though all the standard comb attachment sizes for most clipper company’s which are #0(1/2), #1(1/8), #1 1/2(3/16), #2(1/4), #3(3/8), #4(1/2), #5(5/8), #6(3/4), #7(7/8), #8(1″).
Wahl attachment comb sizes
Guide comb # / Size (inches)
# 1/2–(1/16)
#1–(1/8)
#1 1/2–(3/16)
#2–(1/4)
#3–(3/8)
#4–(1/2)
#5–(5/8)
#6–(3/4)
#7–(7/8)
#8–(1 inch)
#10–(1 1/4)
#12– (1 1/2)


Andis attachment comb sizes (magnetic guards)
Guide comb # / Size (inches)
#0–(1/16)
#1–(1/8)
#2–(1/4)
#3–(3/8)
#4–(1/2)
#5–(5/8)
#6–(3/4)
#7–(7/8)
#8– (1 inch)


Oster attachment comb sizes
Guide comb # / Size (inches)
#0–(1/16)
#1–(1/8)
#2–(1/4)
#3–(3/8)
#4–(1/2)
#5–(5/8)
#6–(3/4)
#7–(7/8)
#8– (1 inch)
#10–1 1/4

Their are many different techniques when using comb attachments to fade hair. Every barber don’t blend, and fade the same way. Each person develops a style of cutting, and a system of cutting hair for each hairstyle, and hair texture.
I will share a simple, and basic way to fade, and blend. The way I learned to cut hair was basically switching from guide comb to guide comb to blend into the size on top of the hair.
Here’s a picture below for reference when i use words of the anatomy of the head when I explain a #1(1/8) on the sides, and #3 (3/8) on top hairstyle.
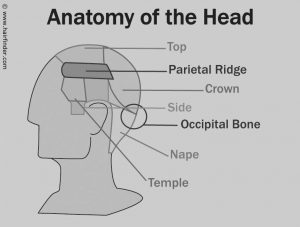
For example if someone wanted a #3(3/8) on top, and a #1(1/8) on the sides. The attachment combs I will need to do this haircut using a Wahl clipper will be the #1(1/8) to make the the first guide line of the fade then a wahl guard #1 1/2 (3/16) followed by a speed o guide #0 (3/16) then a #2(1/4) to blend the ridge section of the head into the #3(3/8) on top.
It’s all a process, and each guide comb between the #1(1/8), and #3(3/8) is needed to complete the haircut of a #1(1/8) on the sides, and #3(3/8) on top fade hairstyle.
I would use a skip guard method on this hairstyle because, it’s easier when first learning to cut hair than fading up towards the top. Skip guard fading gives you room to blend into each guide line you make.
Skip guard fading – Is a method where you skip a guard size up to make a another guide line from your first initial guide line. Then you go back with the guard size in between those two guide lines to blend that area. All it really is is making sperate guide lines with different lengths then blending it all together.
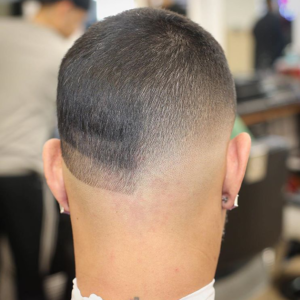
Here’s a picture of an example of skip guard fading
A guide line – Is when you use a attachment comb to make a line in the head when starting a fade or taper haircut. A guide line is also when you make another line after your first initial guide line.
Guide lines are very helpful when learning to cut hair so you can see how much room you have to blend into the next guide line.
For example on a number #3 (3/8)on top, and #1(1/8) on the bottom fade hairstyle using a Wahl clipper, and attachment combs I would first make the first guide line with a #1(1/8) with the lever closed all the way to cut the bottom making the guide line up to the temple area all around the head.
Next I will cut the top of the head with the #3 lever closed then I will use the speed o guide #0 (3/16 also a #1 1/2) with the lever closed to go up about a inch, and a half above the first guide line towards the crown area of the head then after closed position I will open all the way to just barely go over the same spot above where I did the speed o guide #0 lever closed (3/16 also a #1 1/2) getting closer towards the ridge of the head.
The next step is use the #2 (1/4) guard to blend the speed o guide #0 line of demarcation where the ridge of the head is into the #3(3/8) on top. Starting with #2(1/4) guard with the lever open all the way blend into the top of the head then close the lever, and go over the same spot slightly under where you cut with the #2(1/4) lever opened.
All that’s left now is to take out the first initial guide line where you started your fade with the #1(1/8) guard since the midsection of the head, and ridge should be pretty much blended into the top.
Using the Wahl #1 1/2 (3/16) guard staring with the lever open all the way start blending your first initial guide line you made with the #1(1/8). Start going about 3/4 with the of a inch above your first #1 (1/8)guide line with the wahl #1 1/2 guard lever opened all the way remembering not to go higher than where you used the Speed o guide #0(3/16).
Next using same guard (wahl 1 1/2) adjust the lever in the middle position (between open and closed) with #1 1/2 Wahl guard still on the clipper keep blending your first guide line as you see the line to slowing start to go away.
Remembering not to go higher, and just under where you used the Wahl #1 1/2 (3/16) lever open (the same guard). Now with the lever closed all the way with the Wahl #1 1/2 guard (same guard) go just above your first initial guide line you made in begging of haircut with the #1(1/8).
You’ll see the first guide line start to blend, but there will still be a little noticeable line that you’ll take out with the #1(1/8) guard the same guard you started the haircut with.
With the #1 guard open go about half a inch above your first guide line where you used the #1 guard closed. Blending into the Wahl #1 1/2 guard. It’ll probably won’t cut that much, but it’s cleaning up the area.
Now with the lever in the middle using the #1(1/8) guard start cutting barely above the #1(1/8) closed. Cutting just below where you cut with the #1(1/8) lever open. The purpose now is to take out the the first guide line.
Now finally the final step of the haircut of a #1(1/8) on the sides, and #3(3/8) on top fade hairstyle. Close the lever all the way with the #1(1/8). The same guard you started with. Now try using the corners of the blade with the #1 guard closed lever on the clipper to avoid making another line and go just above where you made your first initial guide line with the #1 (1/8) The line will fade away.
Sometimes it helps to stretch the skin if the line don’t want to blend, so that you can just focus on the little line you have to get rid of with the corners of the blade with the #1(1/8) guard.
This is just one example on how to do this hairstyle. This method of cutting will leave the hairstyle with a median fade look .
Overview
Sometimes when doing this method of cutting you might create another line which is okay because all you have to do is use the next guard size up, and starting with the lever open all the way then closing the lever to get rid of any dark spots.
It’s a effective method to use on some hairstyles. It’s also great when first learning to cut hair as it may be more difficult to fade upwards( bottom to top) or fade downwards(top to bottom).
Well I hope you learned at least a thing, or two that will help you in the future.
Who’s hair should you first learn on?
When first learning to cut hair it can be difficult to find anyone that will let you practice on their hair. It’s not a bad idea for you yourself to be the first guinea pig to try out a haircut on as long as you don’t mind having a so, and so haircut if it doesn’t come out that great. You can learn to cut hair after practicing on yourself.
If you are not sure about the idea of learning on your own hair you don’t have to learn on yourself there is other options like cutting a family members hair like your younger brother, uncle, and cousins as long as you can convince them, or they are willing to let you practice on them.
Sometimes you just have to do it, and hope for the best if you want to learn, and get better at cutting hair. As long as you learn the basics, and have some knowledge on how to use the hair clipper attachment combs, and the taper lever you’ll be on the right track.
Trust your ability to give a great haircut. It helps to envision how the haircut before you start on how it’s going look at the end when your all done. Envision the best haircut you can possibly do even if it doesn’t come out how you want it to. Let the person know that your learning, and you’ll try your best.
Inform the person you are going to learn on that it might take longer for you to cut their hair than they’re regularly used to. When you first start learning to cut hair a haircut can take up to an hour to a hour, and a half, and this is normal. You’ll get faster as time goes by. Don’t focus on the time just do your best, and try to make sure there is great lighting where you cutting the haircut so you can see all the details and dark spots in the blend also try to avoid cutting directly in the sun as the sunlight can make your fade look blended, and clean when in reality there are still lines in the blend.
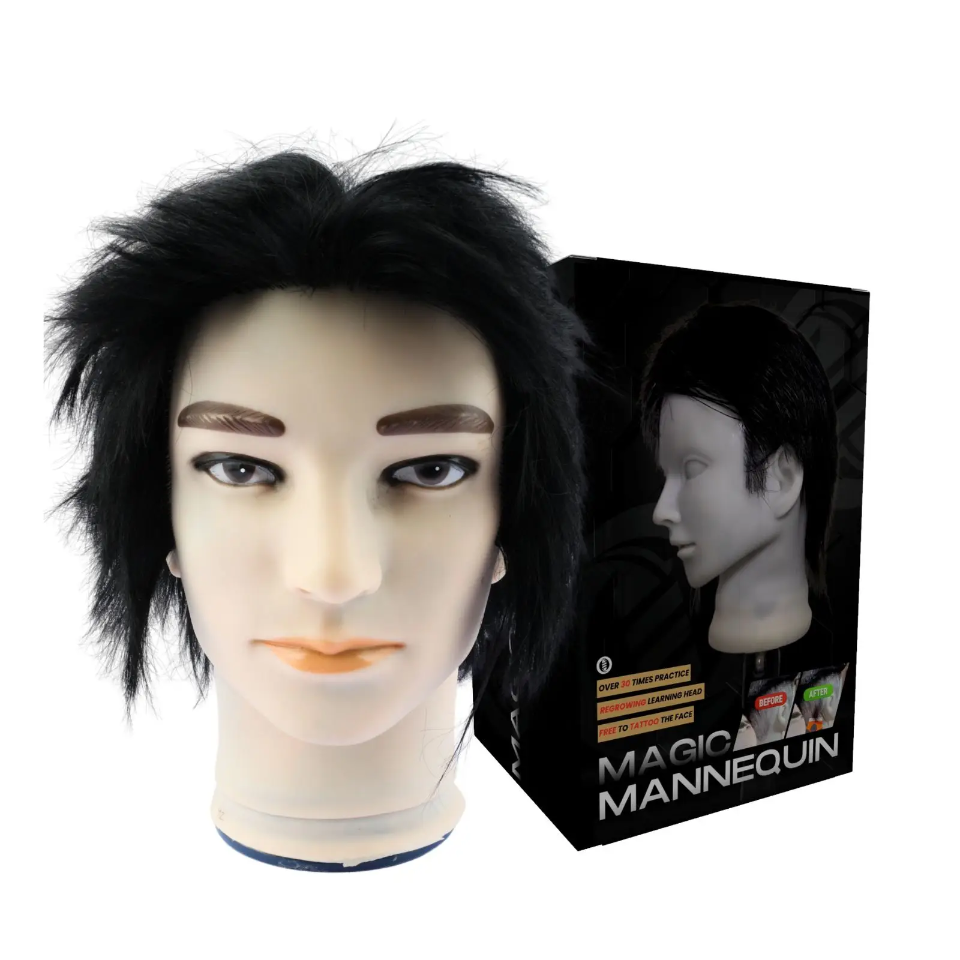
If you have no luck on finding someone that will let you cut their hair maybe you can learn on a Magic Mannequin Barber Head that can be used to practice on over and over up to 30 times. You can practice on the Magic Mannequin Barber Head until you develop greater skills and confidence to cut on a real person.
44 thoughts on “BARBER GUIDE”
Very informative and easy steps .
Thank you for sharing your knowledge it has really helped me and the added videos are a bonus
Thanks for the comment , im glad it was helpful to you. If you have any questions feel free to ask.
So much knowledge here I don’t even know where to start taking down notes. I might just screen shot the entire page cause these are gems! lol THANK YOU!
Thanks for the awesome and informative post on hair cutting tools step by step. It looks like a teacher can teach his or her sons. Which kinds of blades long-term lasting?
Thanks for taking the time to read about haircutting. Can you please explain what you mean by what type of blades are you referring to like trimmer or clipper blades?
Thanks a bunch
No problem
Really nice guide
Thank you for your feedback.
Great info. Thanks.
Can you tell me why Wahl cannot provide guards that fade #1 and #2?
#1 open doesn’t work. Apparently the #1.5 guard doesn’t work. It’s pathetic. So I have to buy a Speed-o guard?
Hi some wahl haircutting sets do come with a half (1/16) and 1 1/2 guard. But most professional clipper sets don’t come with them and you can buy them at your local beauty supply store or online. They either come in white. Or a green half guard and a purple half guard. They also have them in premium metal clip closure combs.
The one guard I mention that helps blends dark spots. Is called a Speed 0 Guide #0 guard (3/16) which is also a 1 1/2. This guard makes the blend so much smoother. It’s not necessary to have it but it could help take out dark spots in between wahl #1 1/2(3/16) into a wahl #2(1/4) if theres still darkness.
If you have a great flicking motion fading technique you won’t need the Speed O Guide #0 (3/16) but for beginners who are barley learning. I recomend wahl company users that they have the wahl 1/16, wahl 1 1/2 (3/16) and the Speed O Guide #0 (3/16) .
Hey, thanks very much. Can the Speedo 0 replace the Wahl 1 1/2 or do you use both/
It can replace it because the Wahl #1 guard will blend into the speed o #0 (1 1/2), and the speed o guide #0(1 1/2) will blend into the Wahl #2 perfectly. But i suggest you have both because some peoples hair are different, and might have dark spots. The wahl 1 1/2 will clean that up.
When you get really good, you wont even need many guards like the speed o guide or the #2. You’ll learn how to cut with clipper over comb to do any fade any haircut and blend from short to long hair. I now use clipper over comb techinque with a #1 on the Wahl clipper lever closed, and a flat top comb to blend most haircuts. But it always good to have comb attachments.
Thanks very much for that.
Very informative and easy to understand I’m at college just learning but each time I cut my sons hairs I ha e messed up and losing confidence fast I really want to make it as a barber but maybe some people aren’t cut out for it ? (Excuse the pun ?)
Thanks for reading, I know how you feel when you mess up a haircut. You must have patience as it requires weeks,months , and years to get at the level you desire. Keep on cutting just learn from your mistakes and continue to try different methods until you develop your own style. It took me about 2 years to get a level where i knew how to cut every hairstyle and every type of hair. It’s a long process and it’s harder than what it seems. A lot of detail goes into a haircut.
This was the most helpful website for beginners I’ve read! I got one question. If you don’t have a trimmer, can you do a bald fade by closing the lever for a guideline then opening it for then next guideline then blending it with it halfway?
Correct. You can do a bald fade just like that. Actually I recommend any beginner to start doing fades just with the zero (#000) or clipper blade closed. As you get more experience start to use the trimmer to bald the fade then move up to the shaver when you feel your ready. Don’t rush it. Or mistakes will be made if start using a shaver on your first bald fade.
Hi I have cut my son’s hair twice but the result isn’t good. I’m using a Wahl clippers and using a #1 up to the temple, a #3 about 2″ above this and blending with a #2 then a #1.5. I still see steps though. I’m a beginner so it’s down to my technique. Any tips?
Hi thanks for reading . Try opening up the taper lever all the way down with the #1 on the clipper to make a 1 1/2 and blend into the the 1 1/2 guard. This will take away a lot of the darkness of the first #1 up to the temple. Next put the lever in the middle with the #1 and blend in between the first guideline of the #1 closed lever and lever open . Next follow up with the #1 1/2 , #2 with just taper lever closed and then taper lever all the way open. No need to put in the lever in the middle with the higher guards. Sometimes with the 1 1/2 guard you might have to put the lever in the middle but that is rare. Some people head shape and hair make it harder to blend especially pointy straight hair. You’ll have to blend and touch up dark spots more.
That was really helpful and comprehensive thank you
Would be great to see more guides from you
Even if it’s the same subject
Plan on doing more content , Thank you for reading
Wow….thank you for this especially during quarantine. This in addition to youtube videos have given me the confidence to fade my hair. I will be the genii pig.
The effort put into writing this is much is not unnoticed. Very much appreciated indeed.
Thanks, I appreciate the acknowledgement
heloo there.
i am starting to learn to cut my hair.
i use wahl #1 with lever open on my sides, then i use wahl #2 with lever close. why i still see step and dark line?
This is very common issue for beginners. I wrote in this article you’ll need to use a Wahl #1 1/2 guard. Also a Speed O Guide comb #0(1 1/2) which is also a 1 1/2. This guard blends the #1 and #2 in nicely aswell. It’s good to have both. Some Wahl beginners sets include the 1/2 and 1 1/2 but not all clipper sets include them. Get them at the your local Sally’s Supply or on online. Those will blends in that darkness and are the missing guards in between the Wahl #1 and #2.
thank you very much.
where can i contact you as professional?
i need help on cutting my own hair since i have scar on my back head, and it cannot grow hair. so i have to be smart to cover it.
Hi, I recommend you get a skin fade to where or above the scar is so it’ll blend in and not be as noticeable.
great advice, great ideas, great store
Thanks for visiting Barber Jungle
I liked it when you shared that it is great to find a barber who will ask what hairstyle their client would prefer. My friend just mentioned the other day that he is planning to get his hair cut since she barely has any time to get it properly trimmed due to the pandemic. I will suggest to him looking for any reliable barber who can provide the right hairstyle for him.
Thanks for visiting Barber Jungle
Dats amazing, I really love dis
Thanks for this great piece ?.?….Please can I get a pdf version and more updates?
Hi, thanks for reading. I’ll look into making it into a pdf. And I’ll be working on another guide soon.
Thank you for listing some of the basic equipment I should have before I start cutting some hair. I’ve decided to try to learn how to cut my boys’ hair since it grows so quickly. I’ll be sure to gather up these things so that I can be ready for the next time they need a haircut.
Thank you for taking the time read. It’ll be more convenient to have all the tools by your side.
very clear and good article easy to understand. Thank you
Thanks for reading
Thankful for this. I am practicing barbering for a month now.
Yore welcome glad Im able to help.
This article offers a solid foundation for beginner barbers, emphasizing the importance of understanding your tools and techniques before taking on clients. As a barbershop owner, I’d add that building confidence and managing client expectations are crucial when starting out. Remember, even the most experienced barbers started somewhere, and every haircut is an opportunity to learn and improve your craft. Focus on clear communication, patience, and a willingness to grow, and you’ll be well on your way to success in the barbering world.
Very informative for a beginner like me .